Pages

Sunday, March 31, 2013

Spinach Artichoke Stuffed Brussels Sprouts


Yep, I went there. 

I never liked many vegetables when I was younger and brussels sprouts was just one that I just avoided. I didn't try one until I was about 23, but ever since then we have been pretty good friends. I usually just toss them in balsamic and roast them, but this time I wanted to switch things up a bit. These spinach artichoke stuffed brussels are so addicting. Any spinach artichoke anything is usually addicting right? But then we stuff ourselves full or tortilla chips or bread for some and it makes us feel a little more guilty. While these are totally satisfying and maybe a little guilty, at least we can say there are no chips! 

10 Brussels Sprouts, Cut in half (long ways)
2 Cloves Garlic, Minced
1 TBSP Neufchatel Cheese (Light Cream Cheese)
1 Cup Spinach, Loosely Packed and Chopped Finely
1/4 Cup Parmesan Cheese
3 Artichoke Hearts, Chopped Roughly

First, we have to make things a little easier to core the brussels.
In a large pot, bring water to a boil and place the brussels insides down into the water. Cook for about 1-2 Minutes until they become a little soft.
Drain the brussels and let them cool.

After they have cooled down, very carefully with a knife or spoon (whatever you feel more comfortable with) Take out the middle of the brussels. They should pop out fairly easily.
Save the insides of the brussels that you scooped out and chop them up.


Preheat the oven to 350 degrees and line a baking sheet with parchment paper or aluminum foil.
In a medium bow, add all the rest of the ingredients.
Neufchatel Cheese, spinach, garlic, artichoke, parmesan cheese and the chopped brussels. Mix together and then stuff the brussels sprouts.
Cook in the oven for 15 minutes.

Put the broiler on to crisp up the tops for a minute or two.

***Be careful though because parchment paper can't go above 400 degrees and a broiler starts at 500 degrees. If you are using parchment paper, take it out and just put the brussels on the pan without the paper.
Serve hot and enjoy! xx


Wednesday, March 27, 2013

What's in a label?


One of the more difficult tasks of living a gluten free lifestyle is figuring out what the heck that label actually means. Big words, small words, words we can't pronounce... I just want to know is this gluten free?!
Here's a few of my favorite websites to make your life a little easier
XO


Monday, March 25, 2013

Jalapeño Kale Pesto


I love kale... Well, I love kale chips. Other forms of kale, I pretend to love because I know it's so good for me. Kale has amazing benefits like tons of fiber, iron and vitamin K. Not only that, but it's low in calories and is filled with powerful antioxidants. Meet your new beneficial best friend. This version of pesto uses kale and spicy jalapeños for a little twist. 

 I was never a big pasta person before I went gluten free, so pasta cravings rarely happen (especially since a lot of the gluten free pasta I have tried is so gummy) The great folks at Ancient Harvest sent me a few boxes of their amazing products. I am officially obsessed with their quinoa pasta. Their pastas are made with a mixture of corn flour and quinoa flour and is far from gummy! I have found exactly what I need for those rare pasta cravings, but for all you pasta lovers try it out. 


Jalapeño Kale Pesto
2 Cups Kale, Stems Removed
3 Cloves Garlic, Chopped
1 Jalapeño, Seeded and Chopped
1/3 Cup Pine Nuts
1/2 Cup Olive Oil
2 TBSP Nutritional Yeast
*Sauce is Vegan 

Spinach Meatballs
1 Pound Ground Turkey
1 Cup Spinach, Finely Chopped
1/4 Red Onion, Finely Chopped
2 Cloves Garlic, Minced
1/8 Cup Ancient Harvest Quinoa Flakes

For the pesto: 
In a small skillet, heat 1/2 TBSP Olive Oil over medium heat. Add the kale and sauté until the kale begins to soften. Add the garlic and sauté for another minute or two but do not let garlic burn. 

Add the kale and all the ingredients for the pesto into a food processor and blend until it's a smooth consistency and there are no chunks.

For the meatballs:
Mix all the ingredients and form into little meatballs. Do not form the meatball too much. Just roll and go. The tighter the meatballs the more tough they will be.

Bake the meatballs for 25-30 minutes at 350 degrees
OR
In a skillet, heat 1 TBSP of olive oil. Add the meatballs and cook in the skillet. Since the meatballs are mini they don't take as long but make sure the internal temperature reaches 165 degrees. 
Enjoy! XO


Friday, March 22, 2013

It's Friday!


Ryan is always so thoughtful.
Have a wonderful and relaxing weekend!


Wednesday, March 20, 2013

Spicy Glazed Mushrooms


I debated posting these mushrooms because they are SO easy to make but everyone is always looking for quick and easy side dishes! Literally, this takes less than five minutes to make especially if you are using pre-sliced mushrooms. Not only is this sauce great on mushrooms but could go on any vegetable to make a saucy, spicy, yet healthy side dish. 

1-2 Cups Mushrooms, Sliced
1 Clove Garlic, Minced
2 TSP Tamari (Gluten Free Soy Sauce)
1 TSP Chili Garlic Sauce
1/4 TSP Sesame Oil
1 TSP Grapeseed Oil 

Mix your sauce ingredients in a small bowl.
In a skillet, head the grapeseed oil over medium heat.
Add your mushrooms and sauté until cooked. 
*I personally don't like my mushrooms too cooked so I only sautéed them for about a minute. 
When the mushrooms are cooked to your liking, add the sauce. Heat sauce and mushrooms for about 20-30 seconds and you are good to go!


Monday, March 18, 2013

The Celiac Awareness Tour


What an amazing weekend! I attended The Celiac Awareness Tour at the Del Mar Fairgrounds. It's a pretty rare occurrence that I am able to eat everything when I walk into a room. I was like a kid in a candy store, a healthy candy store. There were some great vendors there with some new products and old favorites. Not only that but I met some of the nicest people in the Gluten Free world. I have to say, I love my gluten free life. I have been feeling very happy and blessed these days and I don't think I would be at this point in my life without being Gluten Free. My life was changed when I went Gluten Free and I wouldn't have it any other way.

I can't wait to try some of the great products that I was given yesterday. There were tons of samples, but the best part was the goodie bag I brought home. I mean seriously! Look at that! I am in Gluten Free heaven! Over the next few weeks as I try some products I will do short little reviews on each and let all my gluten free foodies know what is worth buying and what to avoid. 


Here's a quick list of some of the vendors! 


Thursday, March 14, 2013

Seasons of Love


Spring is just around the corner with these bright sunny days in San Diego. I like to try and buy fruits and veggies according to season, because they really do taste better. Here is a great little guide that I found on Pinterest that shows you what to eat according to season. Enjoy! xx

Wednesday, March 13, 2013

Garlic Herb Butter


This is probably the only time you will see me go "Paula Deen" on my blog. As much as I loooove me some butter, I try to avoid it as much as possible. I don't cook with butter much but believe me, I miss it. One reason I don't eat butter much is because I don't eat bread! The best part is smearing a big glob of butter on some french bread. Without french bread what's the point of a bunch of calories and fat? Well, I have found the reason for extra calories. We all deserve a little butter from time to time, especially when it's mixed with roasted garlic. 

2 Heads of Garlic
2 Sticks of Unsalted Butter
1/4 TSP of Salt (Unless you use salted butter)
Your Choice of Herbs
*I used fresh parsley, basil, and dried oregano flakes


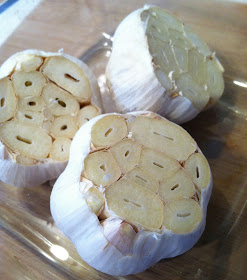
The first step (and best step) is roasting whole heads of garlic. 

Preheat your oven to 350 degrees.
Cut off the tips of the garlic (Shown above)
Drizzle olive oil in the bottom of a dish and then all over the garlic. ALL over. 
Cover the dish with aluminum foil and crimp the edges so it's sealed.
Roast in the oven for 35-45 Minutes.
Start checking around 25 minutes to make sure it's not burning.
Your house will smell amazing at this point. 
Once your garlic is roasted, let it cool down before trying to get the individual cloves out.
(You can also stop here and not make butter. Roasted garlic can be used for so much!)


Cut the sticks of butter into little chunks.
Put chunks into a large bowl and let sit for a little bit until it's softer.
Once your garlic is cooled and butter is soft, take a fork and start squishing the garlic into the butter. 
Add salt and herbs and keep mixing until it's mixed.
It is okay if the butter gets super soft and soupy because it will harden back up in the fridge.
Roll the butter into parchment paper and wrap up! Stick it in the fridge and you are good to go!
P.S. How cute is my heart parchment paper, I love asian markets.


Tuesday, March 12, 2013

Strawberry Lemonade Muffins


When life hands you lemons, bake strawberry lemonade muffins! 
Finally! I did it! I can officially consider myself a baker. After about 5 failed attempts at muffins from scratch I successfully created soft, sweet, and delicious muffins. Of course they are gluten free but also sugar free!  I have been messing around in the kitchen preparing for my first time selling "Annie's Gluten Free Grub" at an art expo next week. I am nervous and excited! I can't just sell mediocre muffins right? I have learned the key to gluten free baking is all about the flours. Finding the right combination of flours was a daunting task. I tried combinations of just about everything and nothing was working. I must have trashed about 60 muffins. I know, that's a waste. I wanted to give them away  but I didn't want to subject anyone to torture. After almost giving up, I decided to give it one more try. I honestly almost cried when they came out of the oven. The key to these was Cup4Cup Gluten Free all purpose flour. I will never use another flour again. These muffins by far are some of the most delicious and moist baked goods ever. I want to give myself the credit, but I am pretty sure it's because of this flour. You can check out their website here: Cup4Cup
Try out their flour for these muffins as well as other great gluten free baked goods. 

1 Cup "Cup4Cup" GF All Purpose Flour
1 Cup Almond Flour
1 TSP Baking Soda
2 Lemons, Zest and Juice from both
1/4 Cup Honey
1/4 TSP Sea Salt
1 TSP Vanilla Extract
2 TBSP Coconut Oil, Melted
3 Eggs
1/2 Cup Unsweetened Vanilla Almond Milk
1 Cup Strawberries
1 TBSP Agave Nectar

Preheat your oven to 325 Degrees
Grease your muffin tins.

In a bowl combine honey, coconut oil, eggs, lemon juice, lemon zest, vanilla extract, and almond milk. Whisk really well, until almost frothy. 

In a different bowl combine your dry ingredients. Cup4Cup flour, almond flour, salt, and baking soda. Mix well.

Mix together your dry ingredients and wet ingredients and stir until blended together. Whisk it! Make sure there are no lumps.

In a blender, add 1 cup strawberries and agave. Blend real quick until you have a thick puree. 

Fill your muffin tins about 3/4 full. On the top of the muffins add some strawberry puree and swirl around. Bake for 16-18 minutes until you poke with a toothpick and it comes out clear. 

Muffins! Enjoy! xx


*Makes about 14 Muffins
*If anyone uses another type of GF All Purpose Flour let me know how it turns out! Leave a comment! xo


Monday, March 11, 2013

Sweet and Sour Turkey Meatballs


I am the meatball queen! Give me 20 minutes and I will have some tasty meatballs cooking.You can't really go wrong with meatballs. I love that you can mess around with sauces and ingredients and you always get a delicious outcome. Seriously though, think about it... Greek meatballs, Asian meatballs, Italian meatballs, Spanish meatballs... Talk about versatile! You can choose your meat too! I typically like to use ground turkey meat as it's lower in fat than beef. Here is the first of many meatball recipes to come. These have an asian flare to them, so pair it with some steamed veggies and rice and you have an easy weeknight meal. 

Meatball:
1 Pound Ground Turkey
2 Cloves Garlic, Minced
2 Green Onions, Chopped
1/4 TSP Sesame Oil
1/8 Cup Ancient Harvest Quinoa Flakes
Salt and Pepper

Sauce:
1 Cup Heinz Chili Sauce
1/4 Cup Tamari (Gluten Free Soy Sauce)
1/2 Cup Sugar Free Apricot Preserves or Jam
2 TBSP Sriracha
1/8 Cup Rice Vinegar

In a large bowl, mix your ingredients together for the meatballs. Form into nice little meatballs. Do not mess with the meatballs too much. Just roll and go. If you roll them too tight, they will be tough. It's okay if they aren't perfectly round, they still taste good!

In the crockpot, combine ingredients for your sauce.

In a large skillet, heat 1 TBSP of olive oil. Brown the meatballs. They don't have to be fully cooked on the inside but make sure the entire outside it browned and formed together. The crockpot will cook them fully. Cooking them first in the skillet helps hold them together since there is no egg or breadcrumbs.

Once your meatballs are browned, stick them in the crockpot. Cook on high for 1-2 hours until fully cooked and saucy! 


Saturday, March 9, 2013

Chocolate Chip Banana Muffins


The best part of gluten free baking is taking a bite and seeing how delicious they turned out! Gluten Free baking can be tricky and downright annoying, but when it's successful, its the best! These muffins were experimenting turned amazing. It was my first time using Quinoa Flour and as always I was a little hesitant. I am not the best baker, but trying to learn by making mistakes and attempting again. It usually turns out as a do-over. These muffins are some of the best banana muffins i've tasted. They are moist, sweet and stayed together really well for Gluten Free muffins. Not only tasty but they are sweetened with banana, applesauce and agave nectar so have a second muffin :]

3/4 Sweet Brown Rice Flour
1/2 Cup Ancient Harvest Quinoa Flour
1/2 Cup Tapioca Flour
2 Bananas, Mashed
1 TSP Baking Soda
1 TSP Vanilla
1/4 Cup Applesauce
1 Egg
1/2 Cup Unsweetened Vanilla Almond Milk
1/2 Cup Dark Chocolate Chips

Preheat your oven to 350 degrees.
Peel and mash your bananas in a large medium bowl. Add to bananas, almond milk, egg, vanilla, and applesauce. Mix well

In a separate bowl, add rice flour, quinoa flour, tapioca flour, baking soda. Mix together.

Add wet ingredients to the dry ingredients and mix until blended well. Add the chocolate chips.

Fill muffin tins halfway.
Cook for 17-20 minutes until they are golden brown on top.
Enjoy! xx 

Friday, March 8, 2013

Jalapeño Almond Dip


Dips usually mean guilty eating. They are filled with cream cheese, fats, cheese, sugars, and all around unhealthy ingredients. Here is a dip that is free of guilt and super delicious! It uses almonds as the base which gives you major nutritional benefits. Almonds are high in vitamin E, aid in weight loss, rich in flavonoids, and help stabilize blood sugar.  
Take the guilt out of eating dips and make this flavorful dip for your next party or just for yourself!
Store in an airtight container in the fridge for up to a week, but it will get eaten before that!

1/4 Cup Water
1/2 Cup Grapeseed Oil
1/2 Cup Raw Almonds
1/8 Cup Fresh Lemon Juice
3 TBSP Nutritional Yeast
1/2 Jalapeño, Seeded 
2 Cloves Garlic
2 TSP Braggs Liquid Aminos
1/2 TSP Salt
1/2 TSP Cumin
1/4 TSP Paprika

Mix all ingredients and blend in a food processor or blender. That's it! 
Serve with rice crackers or cucumbers! Enjoy! xx


Thursday, March 7, 2013

Crispy Quinoa Flake Chicken Strips


I used to live on chicken fingers, french fries, and ranch dressing. I still crave delicious crispy deep fried chicken fingers but don't miss the way they made me feel after eating 
them. Thankfully, most french fries are gluten free but chicken fingers, definitely not. I have found a few brands of gluten free chicken strips from the grocery store but they are always so expensive. These chicken strips are easy to make and budget friendly. The "breading" is made with quinoa flakes and rice flour to make a crispy crust. Using coconut oil in dishes is a great way to get health benefits. Coconut oil can help with digestive problems, strengthens the immune system, and can positively affect thyroid function. These chicken strips are kid friendly too! 

1 Pound Chicken Breast Tenders
1/4 Cup Ancient Harvest Quinoa Flakes
1/8 Cup Rice Flour
1/2 TBSP Nutritional Yeast
1/2 TSP Garlic Powder
1/4 TSP Paprika
2 TBSP Coconut Oil
2 Eggs

In a large skillet, heat coconut oil over medium heat. 
*Coconut is a great oil to use for pan frying. It is a stable oil that doesn't break down at high temperatures. 

Mix together quinoa flakes, rice flour, nutritional yeast, garlic powder and paprika in a bowl. Spread out on a plate or flat surface.

Beat together the 2 eggs in a separate bowl.

Prepare your chicken and trim any fat from strips. Cut the strips if needed into smaller chicken strips. 

Bread your chicken strips by dipping in egg then into the dry ingredients. 

Pan fry your chicken strips until golden brown and crispy. Make sure the internal temperature of your chicken reaches 165* F. 

Serve hot with your choice of dipping sauce. Enjoy! xx


Wednesday, March 6, 2013

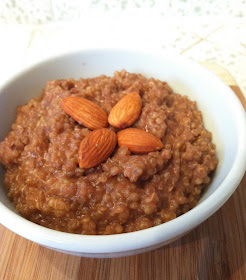
Chocolate Quinoa Pudding


I can't get enough of this quinoa pudding! The Vanilla Quinoa Pudding turned out so sweet and creamy I decided to try and make a chocolate one! Everyone needs more chocolate in their lives. Serve this up for a sweet dessert that will make everyone beg for seconds.

1 Cup Quinoa
2.5 Cups Vanilla Almond Milk *Chocolate can be used too!
1/2 Cup Heavy Cream
1/4 Cup Sugar, Stevia, or Palm Sugar
1 TSP Vanilla Extract
1 TSP Cinnamon
2 TSP Unsweetened Cocoa Powder

Rinse your quinoa well for at least 1 minute under cold water.
*Make sure to rinse your quinoa well as it will have a more dirty earthy flavor if you don't.

In a large skillet or saucepan (I used a large skillet) mix together with a whisk the almond milk, cream, sugar, vanilla extract, cocoa powder and cinnamon. Bring to a simmer over medium heat. Do not let it boil. 

Add quinoa.
Turn down the heat to low and let simmer for 45 minutes to 1 hour.
Stir frequently because a film will form on top.
The longer you simmer the thicker the pudding will be. 
Serve hot and enjoy! xx


Tuesday, March 5, 2013

Cashew or Almond Quinoa Flake Cookies

(Made with Almonds)


Baking Gluten Free treats can be tricky, but I think I have finally mastered a delicious and healthy cookie. Not only is this cookie gluten free and tasty, but it is also egg free, butter free and almost sugar free. Small changes can be made to this cookie to make it vegan as well. Just leave out the chocolate chips or switch carob chips or vegan chocolate. I have made this cookie two ways, using almonds and using cashews. Both turn out sweet and surprisingly moist. 

This was my first time using Quinoa Flakes and I am obsessed. I love finding naturally gluten free ingredients to experiment with. Quinoa flakes are typically used as a breakfast cereal but many people use them in baked goods and breads. Check out your local health or natural foods store for these. I used the brand Ancient Harvest Quinoa and you can check out their website here: Ancient Harvest Quinoa

I make my friends who are not gluten free be my guinea pigs and test things out for me and these cookies were a hit! You know it's a good gluten free creation when your non gluten free foodies are asking for more! They are best right out of the oven and still give your house that homemade chocolate chip cookie smell! Enjoy with a glass of milk or almond milk for a sweet treat! 

1 Cup Raw Cashews (or Almonds)
1/4 Cup Apple Sauce
1/8 Cup Coconut Oil
1/2 TSP Vanilla Extract
1/4 Cup Quinoa Flakes
1/4 Cup Sweet Brown Rice Flour
1/4 Cup Tapioca Flour
1/4 TSP GF Baking Soda
1/2 TSP Sea Salt
1/2 TSP Cinnamon
1/4-1/2 Cup Chocolate Chips

(Made with Cashews)

Preheat oven to 350 degrees.
Line baking sheet with parchment paper.

In a food processor, grind almonds or cashews. Grind for about 2 minutes until the nuts are almost turning into nut butter. Add to the nuts, coconut oil, applesauce, and vanilla extract. 
Blend together and set aside

In a large bowl, add your dry ingredients. 
Stir together rice flour, tapioca flour, quinoa flakes, baking soda, salt and cinnamon. Once your dry ingredients are mixed, add in the nut mixture. 
Mix well until a dough is formed. Add in your chocolate chips and finish mixing. 

On your lined baking sheet, take 1 TBSP cookie dough and form into balls. Flatten them a little bit and keep about an inch apart.
 Bake in the oven for 10-12 minutes until the cookies are golden brown. 
Take out and place on cooling rack.
Enjoy! xx 

*This cookie recipe makes about a dozen cookies. It can easily be doubled to make more. 


Sunday, March 3, 2013

Basic Basil Pesto


Every person needs this recipe in their back pocket. It is so easy to make and takes less than five minutes to put together. You can use this pesto on gluten free pastas, fish, chicken, potatoes and anything you want. The fresh basil tastes so much better than anything store bought and has tons of benefits. Basil has powerful antioxidants and tons of vitamins, especially vitamin K. 
 Store it in an airtight container in the fridge. 

2 Cups Fresh Basil, Loosely packed
1/3 Cup Pine Nuts
1/2 Cup Olive Oil
2 Cloves Garlic
1/3 Cups Parmesan Cheese

Blend all ingredients in a food processor. 
*You can use fresh garlic if you like the taste of fresh garlic
To mellow out the flavor of the garlic, boil 1 inch of water and add garlic cloves for 1 min. Take out and cool down.